Introduction
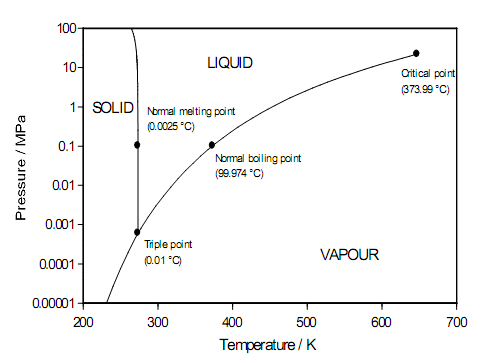
The melting point of water is a very simple, effective and inexpensive temperature reference. Figure 1 shows that the melting point of water at atmospheric pressure is near 0.0025 °C. However, this is not the ice point as it is used as a temperature reference. The ice point is defined as the equilibrium temperature of ice and airsaturated water, which occurs at the lower temperature of 0.0 °C almost exactly. The 0.0025 °C difference is caused by dissolved air in the water and ice.
Historically the ice point was the defining point for many temperature scales until the more precise water triple-point cells were developed. It still has a major role in thermometry since it is a fixed point that can be readily achieved by almost any laboratory with a minimal outlay of resources. It is essential for people who take their temperature measurements at all seriously. Whether the accuracy required is ±100 °C or ±0.01 °C, the ice point is an invaluable aid for ensuring that a thermometer is functioning correctly.
The main advantage of the ice point is that it can be made very simply and extremely cheaply and, so long as the basic principles are followed, it is relatively easy to realize an accuracy of ±0.01 °C. The ice point can be used to achieve uncertainties of the order of ±2 mK but very close adherence to the procedure is needed.

Figure 1. The phase diagram for pure water showing the different temperatures and pressures at which water exists as liquid, solid (ice), and vapour.
The Equipment
To assemble an ice point you will need: An insulating container, such as a vacuum-insulated flask or expanded polystyrene flask, approximately 300 mm to 400 mm deep and 80 mm to 100 mm in diameter is ideal. The flask retards the melting of the ice by its insulating properties. It should be deep enough to hold the full length of the thermometer below its ice point with 50 mm to 100 mm extra depth to accumulate melt-water. If a metal-sheathed thermometer is being checked it will need to be immersed to a minimum of about 300 mm.
A siphon is placed in the flask to enable the removal of excess water as the ice melts. Because the definition of the ice point is the equilibrium of melting ice with airsaturated water, air must be allowed to circulate through the melt water on the surface of the ice. In addition, water has its maximum density at about 4 °C. If a large volume of water is allowed to gather at the bottom of the flask, it is possible for the water to become warm. Thus, the water level should never be allowed to rise to reach the bottom of the thermometer.
Clean, shaved ice that is free of impurities and ideally made from distilled or de-ionised water. Because freezing is also a purification process, food-grade ice made in freezers that employ a washing process is also satisfactory. Good, clean tap water is often satisfactory but should be avoided as it will occasionally be contaminated or have a high concentration of additives from the water treatment process. If tap water must be used check its electrical resistivity; at 10 °C its resistivity should be higher than 0.5 × 10⁶ Ω.m. Some tap water will be completely unsatisfactory in this respect and it pays to check.
The ice must be shaved or crushed, ideally into small chips measuring less than 1 mm across. For liquidin-glass thermometers, which have a poor thermal conductivity, larger chips up to 5 mm will be satisfactory. However, for steel sheathed probes, such as platinum resistance thermometers, fine ice is essential if accuracies of ±0.01 °C are to be achieved. The ice may be shaved using commercial ice shavers ranging from cheap plastic bar accessories to professional ice shavers. A low cost alternative, which is satisfactory for infrequent use, is a food processor with a grating disc. Note that discs with blades or knives are not suitable because they do not cut ice very effectively and the processor will be quickly damaged.
Approximately 300 mL of clean water is required. Distilled water or de-ionised water is ideal, as is the melt
water from the ice. A clean rod of a similar diameter to the thermometer
is used to make a hole in the ice.
The Procedure
First, one-third fill the flask with clean water. Freshly shaved ice is quite often colder than 0 °C. By wetting the
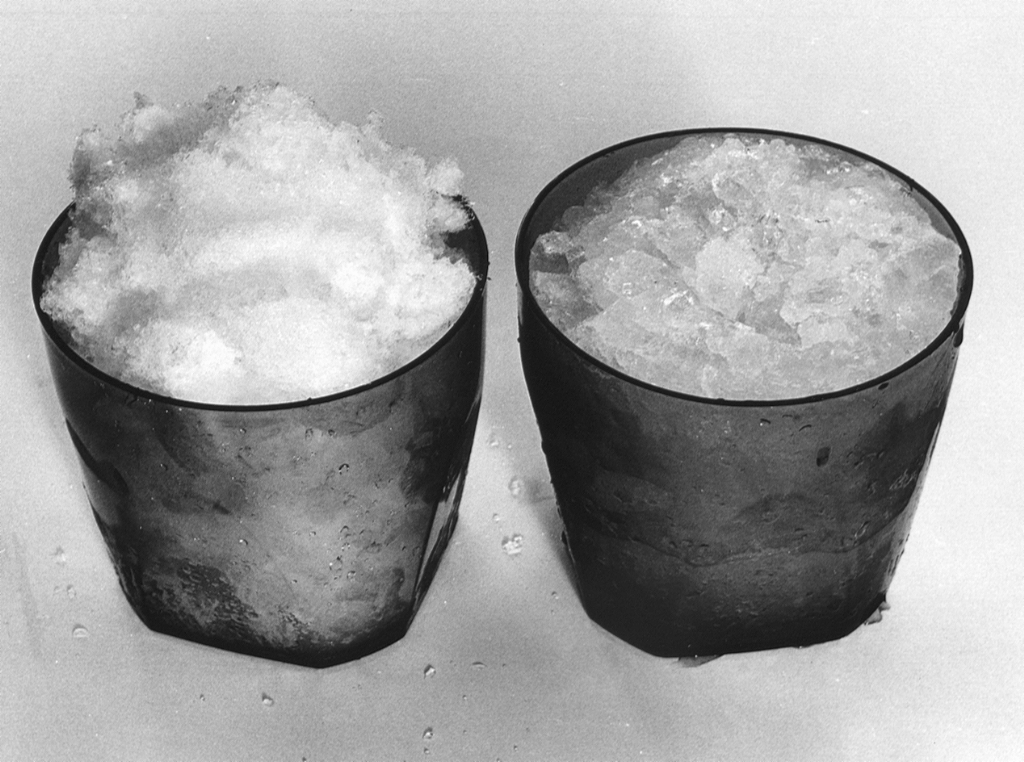
ice we ensure that it is melting. The difference in the condition of the ice is readily visible since cold ice freezes water vapor from the atmosphere giving it a white frosty appearance. By comparison the wet ice, at 0 °C, is quite translucent (see Figure 2).

Figure 2. Shaved ice, with frosty ice on the left and ice after slushing on the right.
Add the shaved ice to a sufficient depth. For liquid-in- glass thermometers, the container should be filled to the top to allow the thermometer to be read without parallax errors. For other thermometers, there must be sufficient ice to ensure good immersion.
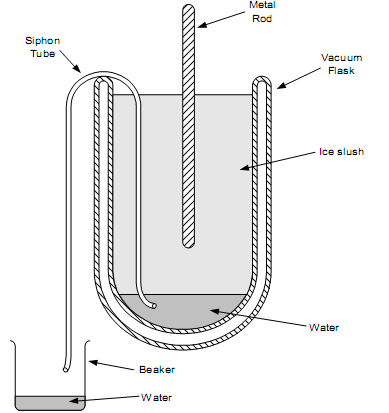
Siphon off any excess water, and compress the remaining ice to form a tightly packed slush. Immerse the thermometer. For liquid-in-glass thermometers use the clean rod to make a hole beforehand to prevent breakage and undue stress on the bulb (see Figure 3)
Wait approximately 15 to 20 minutes for thermal equilibrium to be reached before reading the thermometer. Read the thermometer several times at intervals of a few minutes to be sure that equilibrium has been reached. For steel-sheathed thermometers, it may be necessary to compress the ice quite firmly to achieve an
accuracy of 0.01 °C. Periodically it will be necessary to add ice to the top
of the container and siphon off the melt water to prevent the level rising to the bottom of the thermometer.
Notes
This procedure is not suitable for general thermocouple use. Although it is suitable for a single thermocouple reference junction, it will not cope with the large heat input from many thermocouples or one heavy thermocouple. To ensure good thermal contact with the reference junction a well-stirred ice-water mixture or a commercial ice-point apparatus may be more suitable. The ice-water mixture is, however, susceptible to tem-
perature stratification, i.e. ice at 0 °C floating on top of the water and water at 4 °C (the temperature at which
water is most dense) sinking to the bottom of the container. For this reason the ice-water mixture is not considered a temperature reference and its traceability must be demonstrated by an independent measurement of the ice-water temperature with a calibrated thermometer. If electrical insulation from the water is required, an oil-filled thermowell may be inserted into the ice. The ice-point can also be adapted to suit some low temperature radiation thermometers. This is described in MSL Technical Guide 2 – “The Infrared Thermometry Ice Point.”

Figure 3. An ice-point apparatus for calibrating thermometers or for checking their stability.
References
J V Nicholas and D R White, Traceable Temperatures: An Introduction to Temperature Measurement and Calibration, 2nd Ed., John Wiley & Sons, Chichester, 2001.
Figures reprinted, with permission, from Traceable Temperatures 2
nd
Ed., J V Nicholas and D R White, John Wiley & Sons, Chichester.
Prepared by D R White, June 2002.
